Backing up data can be difficult, especially when you only want to copy files that changed since the last backup. It can be even more troublesome when you have to remember to start the process manually,or you have to delete old backups to make room for new ones. Because of these difficulties, some people decide not to back up data at all, and feel the pain when they accidentally delete the wrong file or their system crashes. TimeVault is a backup utility for Ubuntu that addresses these problems.
TimeVault makes saving and recovering data easy through an automatic process. You define directories to include or exclude from the process, and TimeVault takes care of the rest by creating snapshots of your data. A snapshot is a clone of a directory at a point in time. Files are copied if they've changed since the last snapshot. If a file hasn't changed, it is simply referenced to an older snapshot and no space is used for backing it up. Snapshots are read-only, so they are protected from accidental deletion or modification. If you are the root user, you can delete intermediate snapshots without harming the rest of them. Because of that, you can still restore to a point before or after the deleted snapshot. When you pick what files to exclude, you can specify either a path or a pattern to identify files, which is especially handy if you want to exclude large media files or music directories.
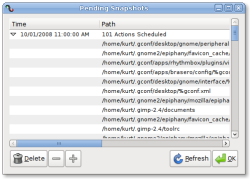
 The Pending Snapshots dialog displays a list of the current backup tasks being performed by TimeVault. Click to enlarge.
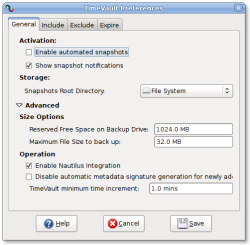
 TimeVault can make backups even easier by automating them. It can be set to take a daily snapshot of included directories without you having to do anything, and will let you know when the automatic snapshot is finished with a notification in the system tray. Automatic snapshots are optional, and can be enabled in the preferences dialog by checking the "Enable automated snapshots" option on the General tab.
Snapshots expire when certain conditions are met, such as after a defined number of days, when enough snapshots have been taken for a single file, or when too much space is used for a file. You can edit and adjust these settings in the Expire tab of the preferences dialog.
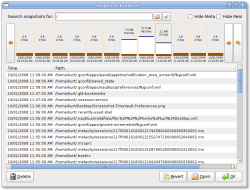
It's simple to restore data with the Snapshot browser. It displays a timeline of all the snapshots taken, the data included, and the size and the number of files in any given snapshot. You can also search the snapshots to find one with a specific file, which is useful if you want to restore a deleted document. You can also delete backups from the Snapshot browser without having to go through the filesystem manually. Also, TimeVault can revert all of the monitored directories back to a certain snapshot. You just select the snapshot and click the Revert button in the bottom right corner.
TimeVault's restoration features are integrated into Nautilus, the GNOME filesystem browser. By right-clicking on a file and selecting the Properties option in the context menu, and selecting the Previous Versions tab (indicated by the TimeVault icon), you can see how many previous versions of the file are stored in snapshots, as well as other basic information. At the bottom of the dialog there are buttons to launch the Snapshot Browser to restore previous versions of files.
Installing TimeVault
TimeVault is not yet part of the Ubuntu repositories. Because of that, you have to download and install a .deb package from the Launchpad project site.
 The preferences dialog allows users to turn on automatic backups and adjust the included and excluded data. Click to enlarge.
 After the .deb package is installed, you can start TimeVault Notifier manually from Applications -> System Tools -> TimeVault in the GNOME menu panel. The Notifier consists of the system tray icon and notifications for completed snapshots, and has convenient access to preferences and the Snapshot Browser. The TimeVault back end will run all the time. For most people, it is easier if the TimeVault Notifier begins at startup. To do this, open the Session configuration panel from System -> Preferences -> Sessions in the GNOME panel. Click on the Add button, type "TimeVault Notifier" in the name box, and "/usr/bin/timevault-notifier" in the path box. Click OK when finished. Next, you should specify a directory to store TimeVault snapshots with a command like sudo mkdir /home/timevault/ . If you skip this, the snapshots will go into the root directory, and that can make things messy.
Tell TimeVault to use that directory by selecting it in the Snapshots Root Directory option under the General tab of the preferences dialog. Lastly, be sure to visit the Include and the Exclude tabs of the preferences dialog to tell TimeVault which files to put in the snapshot. As soon as you finish that, the application will make its first backup.
Kurt Edelbrock is a technology journalist, blogger, and university student. He writes for a variety of open source publications, and serves as a technical consultant for a large public university.

No comments:
Post a Comment