Making labels for DVDs and their cases is an often overlooked task. Many discs are lucky to have some terse information quickly scrawled on them after burning. But there are some fine open source applications available for creating labels for CD-ROM and DVD disks and printing jewel case inserts, including gLabels, kover, and cdlabelgen.
Fedora 9, Ubuntu Intrepid, and openSUSE 11 all provide packages for gLabels 2.2.3 and kover 3, but cdlabelgen 4.1.0 is left out in the cold by all three distributions. I used the packages for the first two projects and built cdlabelgen from source on a 64-bit Fedora 9 machine.
Both kover and GTKcdlabel support looking up the titles of songs on audio CDs. All of these programs include settings for which device you are using as your CD-ROM device, which Compact Disc Database (CDDB) server to contact for lookups, and proxy settings. CDDB lets you enter a disc ID from an audio CD and find out the names of the tracks on the disc and other metadata.
gLabels
gLabels is a GNOME application that's designed to let you quickly print business cards and other labels, including those for CD-ROMs and DVDs. gLabels includes templates for many paper types, so you don't have to worry about offsets and formatting and can concentrate on the content of the labels. If your paper is not already supported, the application provides a template designer to help you set up gLabels once for your desired paper and reuse your new formatting template for future projects.
Selecting File -> New from the menu or clicking on New in the toolbar brings up the media type selection dialog, which lets you choose which paper you are printing onto. The three combo boxes toward the top of the window let you filter the media shown in the list to help you find the media that you have. For example, selecting business cards from the Category combo box will cause CD/DVD media not to be shown in the list. By far the quickest way to filter is by selecting the brand of paper you have, because this greatly limits the selection shown in most cases.
If gLabels doesn't know about your media type, you can tell the program about it by selecting File -> Template Designer to invoke a new media type wizard. On the first page it asks you to enter the brand, part number, and a description for the new media type. The second page asks you for the page size of the label; the third page lets you select between rectangular, round, or CD/DVD labels. Depending on that selection, you will then be shown a page letting you fine-tune the label, as in the first screenshot below. Finally you are asked how many layouts this media type needs (one or two), then asked to position the individual label objects on the paper. Most of the time you will only need one layout -- for example, when printing DVD labels. For some media you might need two, if for instance you have a left and right page design for special labels. This final layout screen, shown in the second screenshot below, is the most complex, because you have to move the individual objects (DVD labels in this case) into the precise positions where they should appear on the printed page. After the layout page you can apply the wizard and your new template is saved. To use a new media type when you create a new label, set the category to User Defined, and gLabels will show all your custom templates.
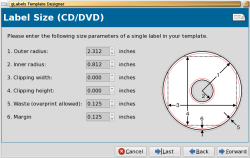 Making media with gLabels. Click to enlarge.
 Once you select your media type you are taken back to the initial window, only now your current label is shown in the left side of the window with the selected object's properties shown on the right, as in the screenshot below. Here, I have added text to the top of my DVD label and a barcode to the bottom. Among the properties for a text object you can set are the style, which includes the font, size, color, alignment, and spacing; the size and position of the object; and whether the text should have a shadow effect applied.
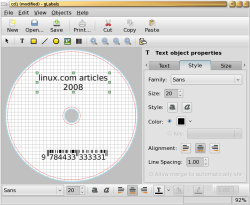 Making labels with gLabels. Click to enlarge.
 gLabels supports text, box, line, ellipse, image, and barcode objects. An image object lets you put on the label a bitmap image like a PNG or JPEG or a vector image in SVG format. For barcode objects you can choose from a dozen barcode formats. In the above screenshot, the ISBN barcode includes text, a checksum, and the barcode. The first three digits form the checksum, and they are calculated automatically by gLabels.
The View menu lets you turn on and off the markers and grid from the display as well as change your zoom level. The red and blue lines around the inner and outer edges of the above screenshot are the markers and the gray square grid lines are the grid; these are not printed and used only to help you design your label. The Objects menu lets you set the stack order of objects, rotate them through multiples of 90 degrees, and align objects horizontally and vertically.
Most of the features of gLabel are available from toolbars that appear above and below the main label display. Although this design makes the interface seem a little cluttered on first inspection, it works well once you are familiar with where the buttons are located.
gLabels' Preferences window lets you specify locale settings such as how units should be displayed (points, inches, or millimeters) and select your default page size -- either US Letter or ISO A4. The Object defaults let you choose what font, color, and alignment to use for text and how thick you want lines to appear, as well as other color settings.
gLabels can make CD-ROM cases (normal and slim), DVD cases (inside, outside, and slim), circular CD labels for the discs themselves, and also business cards, video tape, diskette, and other types of label. The template designer should also let you add support for printing at the correct offsets for custom store-bought labels.
Kover
Kover is a KDE 3 application that is targeted at making jewel case inserts. The main interface is shown in the screenshot below. Selecting File -> New does not bring up a paper selection wizard as with gLabels, but instead simply clears the current design (offering to save it first). The left side of the interface lets you specify the label's title and contents, and the right side of the window shows you a preview of how the jewel case label will appear.
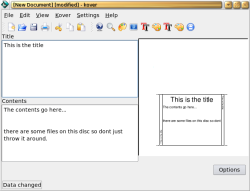 Making labels with Kover. Click to enlarge.
 As you can see, the Contents text box has word wrapping enabled, but no automatic word wrapping is performed for the preview shown on the right side, nor do the contents wrap automatically for the printed cover.
Selecting Settings -> Configure kover brings up a preferences window with six sections. The first section lets you choose a CDDB server and which proxy server to use to contact that server. The CDROM section allows you to specify which CD-ROM device to use for working out what audio CD you want to perform CDDB lookups for, and whether the program should eject a disc in the drive when you close kover. The CDDB files section lets you specify where CDDB lookup information should be cached. The last two sections let you choose default fonts for titles, content, and spine text as well as some miscellaneous options.
There are two main things that kover can print -- an inlet, which you place below the tray that contains the disc, and a booklet, which you put in the front of the jewel case above the disc. Kover lets you print both or either, and will place your contents and title differently depending on which configuration you choose.
Some things in kover are a little confusing. The icons in the toolbar have no labels, and the toolbar uses the same image for icons that change the font and color for the Title and Contents sections. The blue rectangular icon in the toolbar to the left of the leftmost "TT" lets you specify three image files to use for the cover. You can place each image on the booklet or on the inlet. You can also elect to have your image centered, tiled, or stretched on your CD cover from the Image properties window.
Kover is great if you want to quickly create a jewel case insert for a DVD or CD case -- though there is no support for the larger DVD cases. The lack of word wrap for the contents text is a bit of a drawback if you already have a small text file that describes the disc content and do not want to have to manually wrap the text in kover so it will all appear on the printout.
cdlabelgen
cdlabelgen is a command-line tool that also has a Web interface and many graphical clients. You can make a CD or DVD cover using cdlabelgen by supplying only two pieces of information -- the items on the disc and the cover type you want. You can quickly produce a PDF or PostScript file from the program's Web interface without installing any software, or make your own offline with the GTK interface and get a PostScript file to print anywhere you like.
You can try cdlabelgen without installing any software at all by using its Web interface. The Web interface asks you for an optional disc title, barcode, and backgrounds for the front and back of the cover. The only two required pieces of information are the list of items that are on the disc and which type of case you want your label for, such as normal or slim CD cases. Once you submit these details you can download your cover in PostScript, PDF, or GIF format. The GIF image is also displayed inline in your Web browser. An example cover is shown below. Note that there is no option for automatic word wrapping, so you have to break longer items into multiple lines manually. If your list of items is very long, cdlabelgen will automatically use multiple columns on the cover.
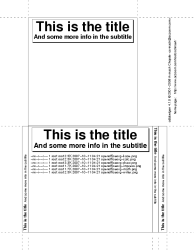 Sample cdlabelgen Web output. Click to enlarge.
 To start the GTK graphical interface, run gtkcdlabel.py, which will bring up a main window similar to that shown below. The Text & Printing tab is where all the labeling action takes place. In this tab you choose the media you are printing to and what the "list of items" to print on the cover are. The cover style combo box and the multiline text box below it are the core of the main window.
The Make Cover section in the bottom area of the window takes a little experimentation to understand. To save a label, you have to type a file name into the Make Cover input box and then click on Save To File. I would have expected the Save To File button to always be available and work more as the Save button in other applications, prompting for a filename if this is the first time you have saved the data or just saving to an existing label if you are modifying an existing file.
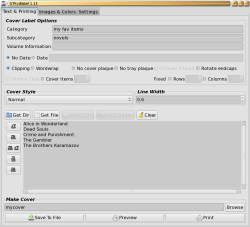 GTKcdlabelgen. Click to enlarge.
 The Images & Colors tab lets you specify the options you would expect from its name. Because GTKcdlabel uses cdlabelgen in the background, the Images & Colors page offers the same options that the Web interface to cdlabelgen does. One downside is that the image files you specify in the Images & Colors tab of GTKcdlabelgen for the cover must be in EPS format. It would be nice if the graphical client, GTKcdlabel, would convert bitmap images like JPEG and PNG to EPS format before calling cdlabelgen with them automatically behind the scenes.
The Settings tab lets you specify where the various programs that GTKcdlabel needs are located, as well as the label's page type (A4, letter, or custom).
Back on the Text & Printing tab, at the bottom of the window, the Preview button generates a temporary PostScript file and runs your default viewer on it. Clicking the Print button dispatches a print job for your label without any intermediate dialog, so you can't select page load options or which printer you want the labels to be printed on. If you have multiple printers, you should probably use Preview and print from your PostScript viewer instead.
When you select Preview, GTKcdlabel displays the command used to make the label in the terminal that you started GTKcdlabel from. This is handy, because you can start a label in the GUI and finish processing it using cdlabelgen from the command line if you want to. One downside I found is that, although you can save covers from GTKcdlabel, I couldn't find a way to loading them back into the GUI again. That means using cdlabelgen from the command line is also the best way to generate a duplicate label should the existing one get damaged.
cdlabelgen can make CD-ROM cases (normal and slim), DVD cases (inside, outside, and slim), circular CD labels for the discs themselves, as well as paper envelope printouts that can be used as cheap holders for raw discs.
Final words
cdlabelgen's Web interface is handy if you are traveling and want to label a few discs using a cheap printing center. If you like how the covers generated by cdlabelgen appear, you might like to use the GTKcdlabel desktop app when printing covers for discs with more private contents. Unfortunately, GTKcdlabel includes a few user interface design decisions that will have you scratching your head. Once you get used to GTKcdlabel, you can use word wrap for the main contents and make both labels for the CD media and cases.
gLabels allows you to print both CD booklets and labels for the discs themselves. The inclusion of paper templates and the ability to fairly quickly make your own, guided by a well designed wizard, is a wonderful feature.
Kover's interface lets you make a jewel case quickly, though for more involved designs you might like to use gLabels.
Ben Martin has been working on filesystems for more than 10 years. He completed his Ph.D. and now offers consulting services focused on libferris, filesystems, and search solutions.
No comments:
Post a Comment